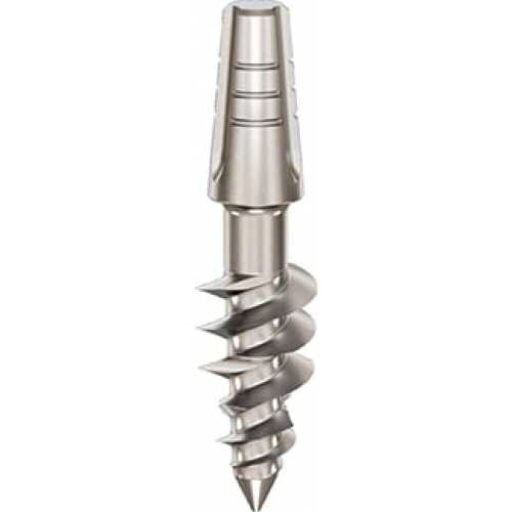
This clinical case study explains in technical detail how Dr Genchev implements his basal implantology protocol to treat a totally edentulous patient with severe bone atrophy.
In 2 hours Dr Genchev completed the implantation of 22 basal implants. And, in 5 days the full restoration was completed with permanent PFM metal-ceramic bridges. No bone grafting. No sinus lift. Just a carefully planned, immediate-loading protocol that gave Marie from 🇫🇷 France a fully functional set of teeth and a new smile.
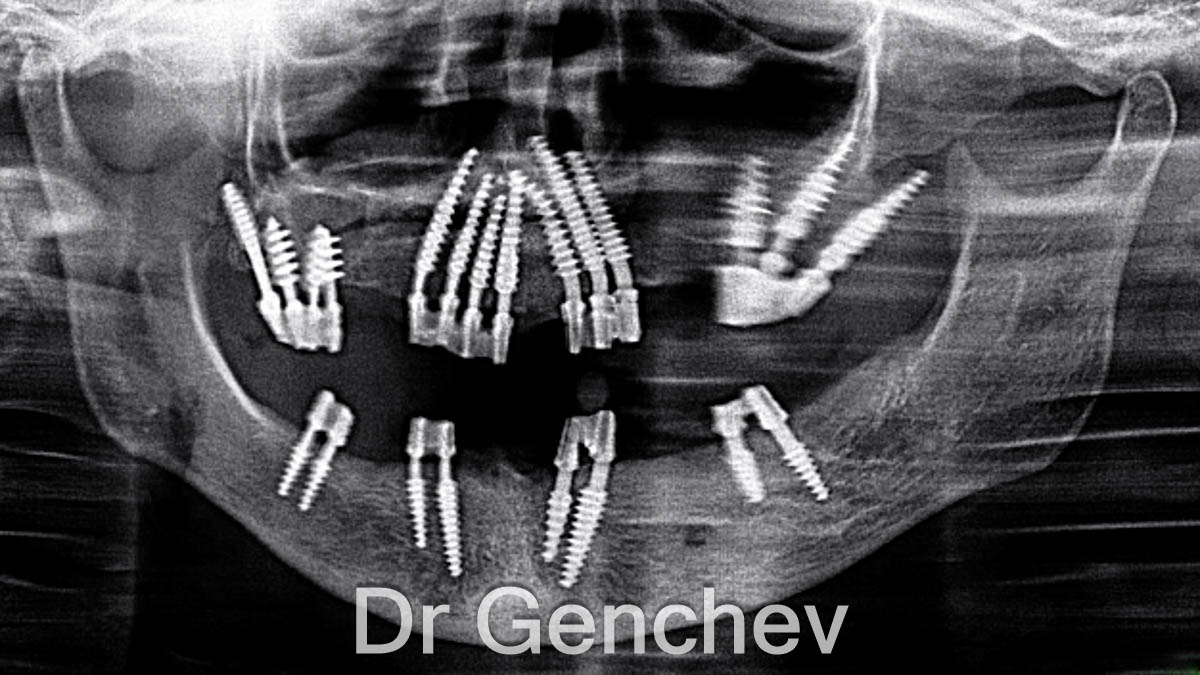
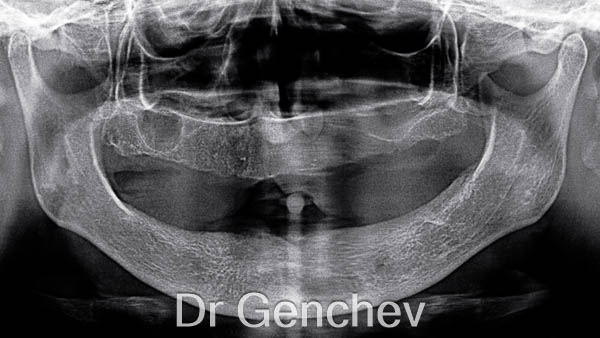
Clinical Diagnosis: The patient presented with Complete Edentulism complicated by Generalized Alveolar Ridge Atrophy (Classification: ICD-10 K08.109, M27.0 | SNOMED CT 13114007, 307779007). Clinical signs include the total absence of natural dentition in both arches alongside significant vertical and horizontal bone loss of the maxilla and mandible.
Planning the Implantation
How does Dr Genchev decide which implants to use and where to place them?
Before every surgery, Dr Genchev analyzes a high-quality 2D OPG panoramic X-ray. He evaluates the height, width and density of the available bone in every zone of both jaws. The quality of bone varies considerably from one area to another, and the choice of implant type depends on what each zone actually offers.
For Marie’s case, Dr Genchev selected three implant types from 🇨🇭 Ihde Dental, each designed for a different bone condition:
- Ihde Dental BCS, for zones with only hard cortical bone remaining and no cancellous bone
- TPG Uno, for zones with both cancellous and cortical bone, using a threaded body to compress the cancellous layer while the tip anchors in cortical bone
- KOS ROOT, for zones with cancellous bone present, where compression generates primary stability, with optional cortical anchorage at the tip
The selection of the right implant for the right zone is what ensures primary stability across the entire jaw, even in severely atrophied bone.
Click to watch the clinical case study video of Dr Genchev’s basal implantology protocol
applied to an edentulous patient with severe bone atrophy
Video Summary
- The Problem: Marie had no teeth left and severe bone atrophy in both jaws — a level of bone loss that rules out conventional implants.
- The Solution: Dr. Genchev placed 22 basal implants across both jaws in a single surgery, using BCS, TPG Uno, and KOS Root implants tailored to the bone condition in each zone.
- The Experience: The full treatment — surgery plus final bridges — was completed in just 5 days, with no bone grafting required.
- The Result: Marie returned to France with fixed PFM metal-ceramic bridges on both jaws. She eats normally and smiles with confidence.
Read the full video transcript
Marie was totally edentulous and suffered from severe bone atrophy. In just 5 days, Dr. Genchev completed a full dental restoration using immediate-loading implants. This video explains Dr. Genchev’s Basal Implantology Protocol by presenting its application in a real case study.
Dr. Genchev is one of Europe’s leading basal implant dentists. He specializes in patients with severe bone atrophy and treats patients from across Europe, as well as the USA, Canada, and Australia. He has developed his own protocol for basal implantology, and his cases are documented in six languages on the website of the Basal Dental Implant Association.
Before surgery, Dr. Genchev analyzes a high-quality 2D OPG panoramic X-ray to plan the procedure. He assesses the height, width, and density of the bone in each area of both jaws. He always starts with the lower jaw, beginning with the most difficult zones, which are typically at the back. In this case, Dr. Genchev used three implant types from Ihde Dental: BCS for pure cortical anchorage; TPG Uno for dual cancellous compression and cortical fixation; and KOS Root for cancellous bone compression with optional cortical anchorage.
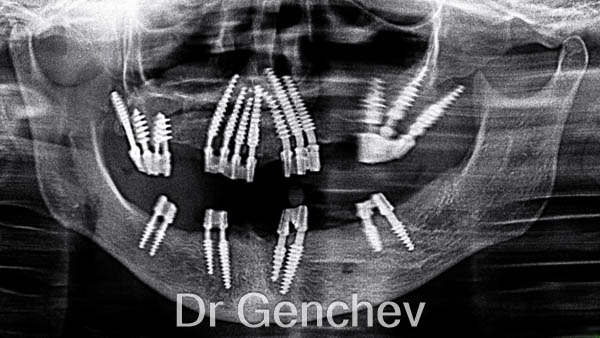
In the lower jaw, there was cancellous bone that was relatively high but lacked width. Dr. Genchev selected KOS Root implants because they provide stability by compressing the cancellous bone. All implants are 3.5 mm in diameter to adapt to the available bone width. In the right posterior mandible (zones 46 and 47), bone height was limited and width was insufficient. Dr. Genchev placed KOS Root implants at 3.5 × 8 mm, prepared with slow-speed rotation and a controlled lingual inclination. The tips were positioned lingually behind the nerve canal and anchored into the Mylohyoid line — the cortical ridge on the medial side of the mandible that always remains densely mineralized. This cortical anchorage gives the implants exceptional primary stability despite the limited bone volume. In the left posterior mandible (zones 36 and 37), Dr. Genchev also used the Mylohyoid line, placing a 10 mm implant at position 37 and an 8 mm implant at position 36, both above and behind the nerve canal. In the anterior mandible (zones 32 to 44), he placed four KOS Root implants at 3.5 mm diameter: 15 mm at position 32, 12 mm at position 43, 10 mm at position 31, and 8 mm at position 44.
The upper jaw was more complex — bone height, width, and density were all uneven. Dr. Genchev chose a combination of implant types to match the bone quality in each zone. In the right posterior maxilla, the cancellous bone had fully resorbed, leaving only hard cortical bone. He chose the BCS series, designed for cortical fixation, and placed four implants: a primary tubero-pterygoid implant (3.5 × 20 mm BCS) at position 17-2, inserted at a posterior oblique angle to reach the medial plate of the pterygoid process of the sphenoid bone; a 4.6 × 14 mm BCS at position 17, through the tuberosity-pterygoid junction; and 4.6 × 14 mm BCS implants at positions 15 and 16, anchored into the cortical bone of the vertical process of the palatine bone. In the left posterior zone, both cancellous and cortical bone were present, so Dr. Genchev selected the TPG Uno series — whose threaded body compresses the cancellous bone while the aggressive tip anchors into the cortical bone of the pterygoid process. He placed three TPG Uno implants: a 3.5 × 17 mm at position 27, a 3.5 × 12 mm at position 26, and a 3.5 × 12 mm at position 25. In the anterior maxilla (zones 14 to 23), the bone had good height but very limited horizontal width. Dr. Genchev placed seven KOS Root implants at 3.5 × 16 mm with a slight palatal inclination. Each tip was fixed into the cortical bone of the nasal floor — a highly mineralized structure that provides a second cortical anchorage point.
The exceptional stability of all 22 implants and the immediate-loading capability of basal implants meant that Dr. Genchev could place the final dental bridges just 4 days after surgery. To prevent any micro-movements during those 4 days and to help the bone regenerate faster around the implants, he joined the implants together with a photopolymer splint.
Dr. Genchev’s prosthetist created made-to-measure bridges to compensate for Marie’s prognathism. The reverse bite was corrected by adapting the crown dimensions, inclination, and occlusal contact points to restore a functional occlusion. The stability of the 22 implants supported PFM metal-ceramic bridges with fourteen crowns on each jaw.
Despite severe bilateral bone atrophy, Dr. Genchev achieved high primary stability across all 22 implants. Marie went home to France with a full set of fixed teeth. She can eat normally and smile with confidence.
The Lower Jaw: Strategic Implantation
How to use the mylohyoid line and avoid the mandibular nerve?
Dr Genchev always starts with the lower jaw, beginning with the most difficult zones at the back. In Marie’s case, the lower jaw had cancellous bone that was relatively tall but narrow. All implants were 3.5mm in diameter to adapt to the limited width.
Right Posterior Mandible (Zones 46 and 47)
How to achieve stability when bone height is limited?
In this zone, bone height and width were both insufficient. Dr Genchev placed two Ihde Dental KOS ROOT implants at 3.5 x 8mm. Using slow-speed rotation and a controlled lingual inclination, he positioned the implant tips lingually, behind the mandibular nerve canal. The implants were anchored into the mylohyoid line, the cortical ridge on the medial side of the mandible that stays densely mineralized even with significant bone loss. This cortical anchorage delivered strong primary stability despite the limited bone volume.
Left Posterior Mandible (Zones 36 and 37)
How to avoid damage to the nerve?
The same mylohyoid line anchorage technique was applied on the left side. Where local bone height was slightly greater in position 37, Dr Genchev used a 10mm implant. In position 36, an 8mm implant was placed. Both implants were positioned above and behind the nerve canal.
- Dentist : Dr Genchev
- Patient : Bone Atrophy
- Treatment : Full mouth dental implant
- Dental Implant : Basal Implant IhdeDental
- Location : Plovdiv Bulgaria
- Time : 1 visit 5 days
- Price : €9990 Euro
Anterior Mandible (Zones 32 to 44)
What are the best implants for cancellous bone?
Dr Genchev placed four KOS ROOT implants at 3.5mm diameter across the anterior mandible. The lengths were adapted to local bone height at each position: 15mm in position 32, 12mm in position 43, 10mm in position 31 and 8mm in position 44. The even distribution across the full length of the jaw, combined with the careful length selection, created excellent support for the bridge.
The Upper Jaw: Implant Selection
How to adapt the implant choice to the bone height and quality?
The maxillary (upper jaw) presented a more complex picture. Bone height, width and density were uneven across different zones. Dr Genchev adapted the implant selection zone by zone.
Right Posterior Maxilla: (Zones 15 to 17)
Why Ihde dental BCS is best for severe bone atrophy?
In the right posterior zone, the cancellous bone had resorbed entirely, only hard cortical bone remained. Dr Genchev selected BCS implants, which are purpose-built for cortical fixation. He placed four BCS implants:
- Position 17-2 (primary tubero-pterygoid): A 3.5 x 20mm BCS inserted at a posterior oblique angle to reach the medial plate of the pterygoid process of the sphenoid bone.
- Position 17: A 4.6 x 14mm BCS placed through the tuberosity-pterygoid junction, where the dense cortical bone structure never resorbs and provides immediate distal bridge support.
- Positions 15 and 16: Two 4.6 x 14mm BCS implants anchored into the cortical bone of the vertical process of the palatine bone. The wider 4.6mm diameter increased cortical contact and improved stability.

Dr Genchev
basal Implant Dentist
Dr Georgy Genchev treats the most complex patients that have no teeth and total bone loss.
His patients come from the USA, Canada, France, Belgium and Switzerland because he treats the patients that other dentists cannot help.
Left Posterior Maxilla: (Zones 25 to 27)
How to use TPG Uno for cancellous and cortical bone anchorage?
The left posterior zone retained both cancellous and cortical bone. Dr Genchev selected TPG Uno implants, whose threaded body compresses the cancellous layer while the aggressive tip anchors into the cortical bone of the pterygoid process. The polished surface of the TPG Uno also helps to prevent bacterial colonization. Three Ihde Dental TPG Uno implants were placed:
- Position 27: 3.5 x 17mm, the longest implant, reaching deep cortical anchorage in the pterygoid plate of the sphenoid bone.
- Position 26: 3.5 x 12mm, anchored in the pterygoid process.
- Position 25: 3.5 x 12mm, attached to the pyramidal process.
Three implants were sufficient to support the bridge because they utilized both the cancellous and cortical bone layers together.
Anterior Maxilla: (Zones 14 to 23)
How to use the nasal cortex?
The anterior maxilla (zones 14 to 23) had reasonable bone height but very limited horizontal width throughout. Dr Genchev identified two cortical anchorage opportunities: the dense cancellous bone layer itself under compression, and above it the cortical bone of the nasal floor, a highly mineralized structure that provides a reliable second anchorage point.
Dr Genchev selected KOS ROOT for this zone because its rough surface generates primary stability through compression of the cancellous bone, and the top 4mm of the implant is polished to prevent bacterial colonization. He placed seven KOS ROOT implants, all at 3.5 x 16mm, with a slight palatal inclination. Each implant compressed the cancellous bone and fixed its tip into the nasal floor cortex. The 3.5mm diameter was the maximum safe option given the narrow bone width.
The seven implants were distributed strategically across the full length of the anterior maxilla to evenly spread the forces of mastication. For Marie, this translates to long-term comfort when eating normally.
the Dental Bridges
How to correct a reverse occlusion with basal dental implants?
The exceptional primary stability achieved across all 22 implants meant Dr Genchev could place the final dental bridges just 4 days after the implantation. To minimize any micro-movements during those 4 days and to support faster bone regeneration around the implants, Dr Genchev joined the implants together with a photopolymer immediately after placement.
Dr Genchev’s prosthetist then created custom-made bridges to correct Marie’s prognathism. The reverse bite was addressed by adjusting the dimensions of the crowns, their inclination and the occlusal contact points to restore a functional bite. The stability of the 22 implants was sufficient to support PFM metal-ceramic bridges with 14 crowns each in both jaws.
Despite severe bilateral bone atrophy, Marie left for France with a complete set of permanent teeth in under a week. She could eat normally and smile with confidence.
Medical Disclaimer & Review
This article was produced by The Dentist Marketing Agency for educational purposes and was medically reviewed by Dr. Genchev on August 16, 2026, to ensure clinical accuracy. Dr. Genchev specializes in the full dental restoration protocol, which utilizes basal implants to rehabilitate edentulous patients with severe bone loss or gum disease without the need for bone grafting. Dr. Genchev ensures that all descriptions of the implantation technique, the €9,990 pricing for both jaws and the single visit of 5 days treatment timeline reflects current clinical practice and safety standards.
Last Updated: 08-16-2026
How to book a consultation?
Ask for a call back from Dr Genchev
Ask Dr Genchev for a consultation for a dental restoration with basal dental implants. Dr Genchev will explain the treatment plan based on your dental condition and provide a price for the treatment.
Request a call
Treatment Overview
Dental restoration with basal dental implants:
- Treatment: Rehabilitation of 1 or 2 jaws.
- Dental condition: Dr Genchev treats gum disease, bone loss, and total edntulism.
- Price: Depending on the treatment.
- Location: Plovdiv, Bulgaria.
- Time: 5 days.
By completing the enquiry form you agree to Dr Genchev’s team contacting you. The Basal Dental Implant Association does not endorse any dentist featured on its website. And it is not responsible for your choice of dentist and dental treatment.